Where art and technology meet to inspire creativity... maybe.

Category: EDCI 336 (Page 2 of 3)

This is a category for the EdTech course. Please add this category in addition to the relevant edtech assignment category(ies).

Weekly Reflection 6: Classroom Accessibility

When I was in High School, I don’t remember there being a focus on accessibility or inclusion in the classroom. In fact, what I remember was a segregation model, where students who did not fit standard in some way, were excluded from the classroom, and would spend a lot of time in the special ed room instead, or one on one with a TA. You either assimilated to the standard, and pretended that everything was fine, or, you were separated, unable to interact with your peers during school hours. On top of this, most teachers were not very accommodating to students when they asked for some form of accommodation or accessibility aid. If for example, you needed more time for an assignment for pretty much any reason, the majority of teachers would not accept an “extension” or a late assignment. In fact, the first time where I saw students asking for extensions for anything other than medical emergency as okay, was in University.

Something that has come up a lot in this program is the Universal Design for Learning, which suggests that we make accessibility the standard in our classrooms, and we aim for inclusion of all students. This means making something such as fidget toys, or extra assignment time accessible to anyone in the class, whether they have a diagnosed “reason” for these accommodations or not. Through UDL, teachers allow the opportunity for anyone who not just needs, but wants access to something to have it. UDL also highlights the importance of making accessibility a priority in anything we do, that way all the students in our classroom can participate the the same activities, rather than singling out or excluding someone due to an accessability issue. Through this inclusion, we are making sure that our students can participate in our class, and form relationships with their peers, rather than be separated from them, which I personally think is just as important as their academic learning to the school experience.

Image from Guillaume Richards’ Ed Tech slides

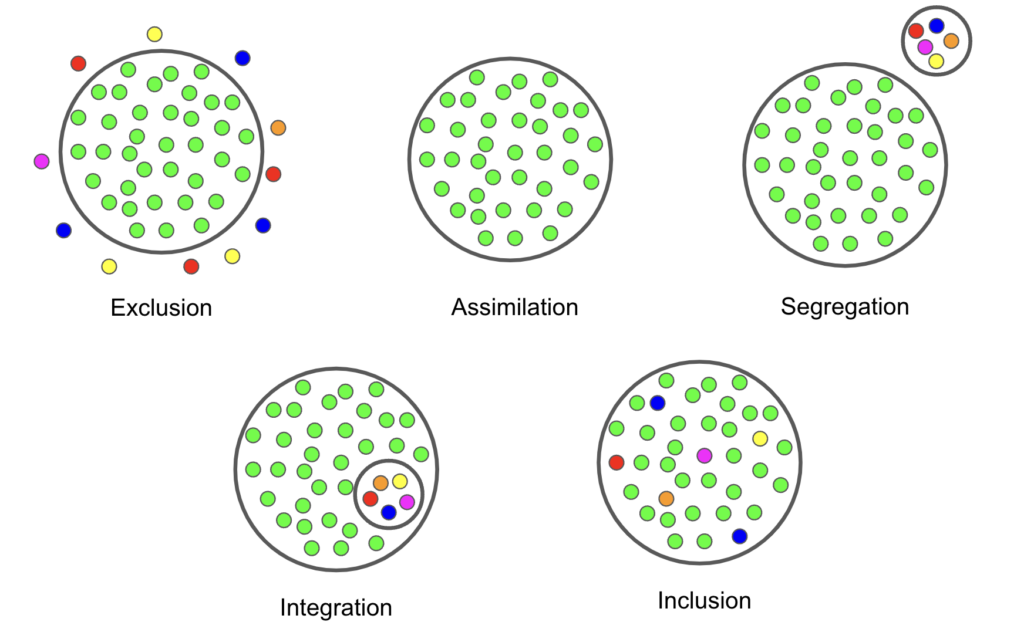
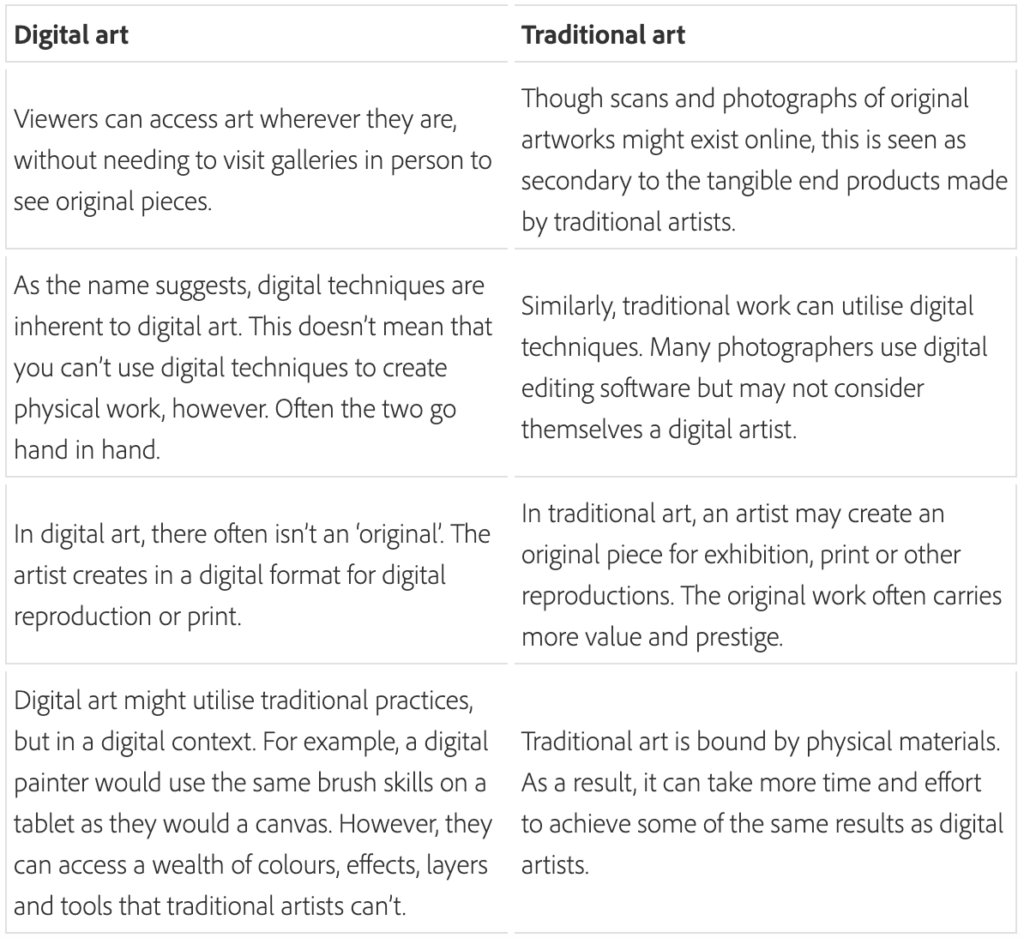
I really liked this chart that Guillaume showed us in class that explained different terms surrounding inclusion and accessibility in classrooms, that I think shows the importance of inclusion, as opposed to segregation, or even integration. Through UDL, we are trying to include students with diverse needs, and not looking at them as “others,” but rather as students who have value and are still part of the group.

I wish this was something that was considered more heavily when I went to school. I think it would have saved me and many others a ton of anxiety, and would have made those of us who felt like outsiders more included and welcomed into the class.

Weekly Reflection 5: Pandemic Education

This week we talked about the impact that covid-19 had on the education system, and how it forced classrooms to shift to an online learning model. This online learning model opened up the doors to new opportunities for various types of synchronous and asynchronous learning. While this model allowed for a new flexibility of learning, it also came with many drawbacks such as a lack of social connection, or a lack of a familiar structure.

I was lucky, because I avoided “Zoom school” through my degree. I started my degree in 2015 and paused in 2018, not returning until 2021, after the pandemic had shut down classes,  and the world had started to adjust to a new system of learning. But as a result, I developed a unique perspective of only seeing the before and after of exclusively online learning, rather than during. I saw a pre and post covid world of education and how the university had changed its structure of lecturing, and assessing work. I was very lucky because I was not one of the online learning Guinea Pigs, but rather, someone who got the hybrid learning in the years after. Here are some of the main things that I noticed:

  1. Access to material changed

Before covid, if you were sick, you had to reach out to another student to learn what information you had missed in class. You needed to collect their notes, or meet up with the professor in their office hours to catch up. However, after covid, the University became more understanding of students missing class. A majority of Professors realized that they could make their lectures accessible to students who had to miss their lectures via Zoom recording, or even just posting their lecture slides online.

  1. Assessment had changed

The shift to online classes mean the end to in-person exams as we know them. Because students could no longer sit in a room and write an exam that was guarenteed to be written completley from memory, the assessment methods had to change, and those changes stuck even in the years following the return to in person classes. From the time that I return to my degree to it’s completion, I took 24 courses, and only ONE of those had an in-person, question-based exam, three had in-person final essays, and the other 20 had a variation of either a take home exam, which was essentially an essay prompt that you had between 3 days and a week to complete, or, simply a final essay due during the exam period.

Overall, I think it was definitely something that I had to get used to when I came back to school. While I initially hated the shift from in-person exams to online essay based exams, I think that it actually helped my grades and allowed me to have a stronger grasp of the material, especially in things like History and English degrees. It allowed me to actually engage in the material and ask questions, rather than memorize simple facts that would leave my head just a month after the exam was over. In addition, having access to lecture slides and recordings has been an amazing development for me. While at times it gave me a weak excuse for why I was skipping class, it was also an amazing resource for studying, and allowed me to stay home from class if I wasn’t feeling great, without the stress of what I could be missing. I think it was a much needed shift in how we think about accessibility in the classrooms, which ties perfectly into next weeks topic…

Free Inquiry 5: Digital Art Part 2 – AI

AI: Artificial Intelligence. It’s the new thing that everybody is talking about. It’s a little bit scary, but also quite intriguing to see just how much AI can do now, and just how far it has come in the last few years. Until around 2 years ago, I had never even thought about giving a computer a prompt to see what it could do, let alone just how well it could do what you ask.

In many ways, It is really cool to see what kinds of things AI can come up with. Just look at last week’s weekly reflection, where I was able to ask an AI generator to create images of Darth Vader at a nightclub. Not only could the generator actually produce the images, it could do it well. I have seen some AI generated images that look a bit wonky, human-like characters have extra limbs, or it just can’t quite get faces right, but these images were fairly realistic, and far better than anything I could have done, or even imagined, myself.

While AI allows for new forms of creativity and artistic expression, it has also become a very prevalent topic of discussion and concern, primarily around attribution, copyright, and plagiarism.

If you give an AI generator a prompt, and it comes up with an image for you, who owns it? Who is the artist? If AI generators create images based on it’s ability to scan the internet for ideas, then how do the artists that are being used for inspiration get credit? Can you pass off the work of AI generation as your own digital art creation?

Another question that has many people concerned is the question of work for artist or other working professionals. This has recently come up in the media through the Disney+ TV show Secret Invasion, in which the entire opening credits video was AI-generated. Many people were upset with Marvel over this situation, because of not only the issues listed above about attributing, but also the issue of putting artists out of work. It was suggested that the use of AI to create this video replaces the artist, so the studio doesn’t have to pay someone for their time and skill. Many people are worried that this is just the start of the industry replacing artists and looking towards AI as the answer instead. Personally, I think that there are some very valid thematic reasons why Marvel may have chosen to use AI for this specific opening sequence. Nevertheless, these criticisms are completely fair and perhaps have some truth to them, and do raise important questions about the future of AI generated artwork and it’s place.

All that being said, I genuinely have so much fun using AI to create art, just as a hobby. I can get distracted and entertain myself for quite some time just giving an AI generator prompts and seeing what it comes up with, and then refining my prompts and making them even more interesting. For example, I spent way longer than I needed to today just playing around with the app WOMBO Dream – AI Art Generator and seeing just how similar or different some of the variations of the reference image I could get.

The reference image, if you need a refresher:

A photo of a woman singing on a stage

There were many different styles of art that the app would filter the image through to create many different images. The app also allows the user to adjust the settings on how much influence the reference image would have over the AI-generated image. I was able to get many images that were really close to the original photograph when using a strong influence simply using the prompt “create an interesting image using this photograph as a reference”

There were also some that were close but not fully the same in the “normal influence” category. Here is where I found some of the more interesting interpretations, including one that looked a lot like Michael Jackson, which I found very interesting, considering the fact that the performance in the original photograph is of a Michael Jackson song.

Finally is the minor influence images. These were the ones that least looked like the photograph, including only similar shapes colours or ideas. Some of these were very cool, but a few I struggled to even see the connection to the original.

As you can tell, I had a lot of fun with this. These are only a handful of the images I asked the app to create. The diversity of what I was able to create shows us a lot about versatility in what can be created. It was also really cool to see some of these images and how well-made they looked. I would have believed that a person made many of them if that’s what I was told. Thus begging the question again about credit, and plagiarism. That being said, I will probably do this again some time as an casual pastime, as it is fun to see what the AI generator can create.

To find my weekly reflections on this course and my learning, look Here

To find my other inquiry posts, look Here

Free Inquiry 4: Digital Art Part 1-Procreate

This week I have chosen to look at digital art and art apps such as Procreate.

Digital Art is defined as any form of “artwork that draws upon digital technology as an essential part of its creative process” (What Is Digital Art? 2023). It was first utilized as an art medium in the 1980s with the invention of AARON, a painting robot developed by an engineer, Harald Cohen. By the 90s the idea of digital art had grown to include the use of personal computers, and the art medium has only continued to evolve as technology has developed further, into what we see today where digital art is an expansive and easily accessible way to create. Below is a chart that compares digital art to traditional art:

Table found in the Adobe article, “What is digital art?” (2023).

One of the most popular ways to develop digital art today is through Procreate. First created in 2011, Procreate is an art app which focuses on sketching, painting, and other forms of illustrating, made exclusively for iPads. Something that I think is really cool about Procreate is its accessibility. Anybody, from a kid in one of your classes, to professionals working in the film industry can use Procreate. For example, did you know that the logo for the show Stranger Things was created on Procreate?

Procreate is also relatively easy to learn how to use, with plenty of brush options and app features that allow the artist to create their own unique image based on their own art styles.

While the app is accessible, it can able be expensive when starting out, compared to traditional art. While you can find basic art supplies at the dollar store if you are a casual artist, procreate doesn’t really have a dollar store equivalent. You fist have to acquire an iPad and then purchase the app, which itself is only $17.99, however, to really use it you also need to purchase an apple pencil, or stylus, which in its most affordable form is $109. However, once you have these tools, you dont need to spend any more money on tools, or replenishing supplies.

Now, I must admit that this week I did not actually recreate the image myself because of these financial limitations. Primarily, I did not have an iPad, and I was not going to purchase one for this activity. However, one of my friends, Lindsay, does, and she just recently started diving into digital art using Procreate, and she asked me and some of our other friends to give her suggestions of what to make. So, I asked her if she would be willing to recreate the image for my inquiry project, and this was the result as her 5th digital art creation:

Because I did not create this, I cannot speak to the process of creating it. However, I do want to publicly thank my friend for doing this recreation for me, so that I could include this topic in my inquiry project.

References:

Bravic, L. (2023) A Short History of Digital Art: Between new technologies & innovative artistic practices. Artland Magazine. https://magazine.artland.com/digital-art/

What is Digital Art?. Adobe. (2023). https://www.adobe.com/uk/creativecloud/illustration/discover/digital-art.html

To find my weekly reflections on this course and my learning, look Here

To find my other inquiry posts, look Here

Weekly Reflection 4: “Graphic Design is My Passion”

(that is a joke)

This week, we looked at simple graphic design using websites like Microsoft Designer and Canva. These tools are incredibly useful as they allow you to create a variety of graphics for free and very accessible to even a beginner. I am quite familiar with Canva and have used it many times for other courses and jobs, so to create the banner you see above I used Microsoft Designer, a tool that I had no prior knowledge of going into this class. This tool is very similar to Canva, however it uses AI to generate the design you want, and can include AI generated images that you prompt. For this banner for example, I gave multiple prompts for images about art supplies, and chose my favourite images to include in the graphic. Next I typed into the prompt “Create a WordPress blog header for my art blog” into the prompt for the graphic design, and the site then generated multiple graphics for me to choose from. Some of the designs included a title or subtitle on the graphic, however I chose one that just included the images.

I also created a more “fun” graphic advertising for a nightclub based in the Starwars universe. For this one, I asked the site to generate images of Darth Vader indulging in various activities seen that can be done in a nightclub, and included the prompt “Create an infographic for the best nightclub in a galaxy far far away.”

This is a really interesting tool that is useful in a classroom setting. As a teacher, we don’t always have the time to create awe-inspiring graphics each day for class, but with tools like this, we can do something equally as interesting, but in half the time. One downside, however, is that this tool is incredibly distracting, as you can see from my Darth Vader graphic that is oh so obviously on topic.

Weekly Reflection 3: Screencasting & H5P

This week, we looked at Screencasting through Screencastify and H5P, which can be used together to create interactive videos. Interactive video is a great way for us, as teachers, to keep students engaged with the material they are learning in a way that is both interesting and helpful to their memorization. Screencasting works well with dual coding theory, which states that students learn best when combining audio and visual elements, such as a video and a voice recording.

Last week, we began to look at screencasting and were asked to include a screencast video in our inquiry projects. I included a time-lapse video rather than a screencast. However, they are very similar as they both include audio elements over a video. Additionally, I have used the Screencastify Chrome plugin before, so I was at least familiar with it.

Below is an example of a time-lapse video, from my inquiry project last week:

H5P was a new concept to me. It is a website which allows people to create and use HTML 5 content and applications (interactive content). This is a great tool, especially for educators. I love that H5P allows us to add interactive elements to these videos, such as a quick multiple choice question in the video. These elements further drive up engagement in the videos so that the dual coding process can take affect and strengthen learning and comprehension. If there are interactive pop-ups throughout the videos, students are going to be more engaged, waiting for the prompt, but it also means that they are paying closer attention to the material so that when the prompt comes up they know the answers.

As a Social Studies or English teacher, I find this tool extremely useful. If I use the tool for a grammar lesson, I could include a multiple-choice prompt asking students which sentence is grammatically correct. Or, in a Social Studies class, I could include a question to ask students what they think about a historical event or what they think was the most impactful outcome of, for example, the black plague. Another example is the timeline tool, which would be amazing in highlighting story progression in an English class or creating a historical timeline in Social Studies.

H5P has many other options as well for useful interactive tools as well that I believe would be amazing in a classroom across various subjects. I’d love to see what others in the class found to be the most interesting application!

Free Inquiry 3: Suprematism

This week, I chose to focus on abstract art. The style of abstract art I have chosen is called Suprematism. Suprematism is an early expression of abstract art that came out of Russia during the First World War. The style is characterized by simple motifs such as the square, circle, and cross, and employed non-Euclidean geometry, a practice which gave the illusion that geometric forms were floating in space.

The goal of the art style was to achieve the “zero degree” in painting, which was “a point which the medium could not go without ceasing to be art;” its most fundamental form. The image seen on the canvas was meaningless, while the significance came from prioritizing the supremacy of feeling and expression.

The first person to use Suprematism was Kazimir Malevich, in 1913.

If you would like to learn more about Suprematism, there are links to my sources below:

Art Movement: Suprematism, Artland Magazine.

Suprematism, The Art Story.

For my own Suprematism piece, I decided to start with an off-white base, even though my image has a much darker background, as that is a common trend that I see in the style. Suprematism also has a lot of very bold, basic colours, whereas my image mainly uses varying tones of blues and purples. This also meant that I had to adapt even further my piece just starting with choosing the colours to use that would still reflect the art style and the image. I tried to stay true to the colours as best I could, but I did adapt the lights especially.

What I liked about painting using Suprematism was that I was much less conscious of how it looked than I was with the sketch. Although I likely could have been more precise, I was less worried about the accuracy of recreation, instead just trying to capture the general idea. Where I think I missed the mark on this painting is in the “non-euclidian geometry” aspect of the style. I only realized halfway through painting that all my lines were perfectly vertical, rather than at an angle; I only corrected this when adding the “people,” so it does not have the same floating visual.

Overall, this was a really interesting experience as I had not heard of Suprematism until I researched for this week’s recreation, and I’m glad I did. I had fun working on this one, even if my lines aren’t as crisp or angled as I would like them to be.

To find my weekly reflections on this course and my learning, look Here

To find my other inquiry posts, look Here

Free Inquiry 2: The Sketch

While last week I wrote about what I was doing, I never revealed the image that I would be recreating for the next nine weeks. So, this week I thought it would be a good idea to reveal the reference photo and explain a little bit about why I chose it:

A photo of a woman singing on a stage

When choosing an image to recreate I had to think about a few things:

  1. Can I use the image without fear of copyright strike? Due to caution, this meant no album covers or film posters.
  2. Are there people in the image? This was a priority for me, as drawing people is something I am admittedly horrible at, so I wanted something that would push me out of my comfort zone, while also allowing for the most freedom in choosing an art style to recreate the image in.
  3. Is it visually attractive or interesting? I wanted something that had a range of dynamics and colours, that would allow me to focus on different aspects of the image as a priority each week, and also something that would be fun to recreate.

So, this is the image I chose. Yes, it is me, but that’s actually not why I chose it. Being me is an unfortunate byproduct of hours of searching for the right picture and coming across this as the one that seemed the most interesting to me. And no, I will not be taking questions at this time, let’s focus on the art side of this.

I chose this image mainly because of how the lighting worked to create an interesting colour pattern. I love how the stage lights and background screen work together to create a moody tone, and I think it just looks pretty. Second, because yes, there are people, but they are all slightly obstructed, especially in the face, which gives me a little bit of grace while also still checking off my second point.

The Sketch:

This week, I started my journey with a “simple” black-and-white sketch focusing on the shadows and light in the image. I chose to begin with a sketch because I thought it would be a great way for me to create a baseline for myself for how easy or challenging this project would be. It would set both my expectations and yours, for my ability and it challenges me to do something I’ve never done before. For this first attempt was done going in blind, as I did not do any research into the basic art theories of how to create shading in a pencil sketch. As this was my first week, this was intentional as a way to see what I could figure out on my own.

You may or may not be able to tell, but this took a lot of trial and error, and I found that as I went on, my techniques got more refined. For example, I always started from the left side and worked my way right. You can notice that I used a tiny eraser for the first stage light and realized that this did not work and had to change it. I also realized that I started this drawing off with a mechanical pencil and small eraser, but as I went on I realized that this was not the best choice and switched to a regular pencil and larger eraser to help with the shading and highlights on the image.

Through this process I learned the importance of shading and how to add dimension when all you’re using is a pencil, finger, and eraser (however if I had the correct pencil and eraser I wonder if it could have been a little better). I also realized just how long this takes. What I thought would be an hour out of my evening became multiple days of effort. The final product is not good by any means. In fact, it’s actually kind of embarrassing to be putting this on the internet, and I still can’t draw people, but I am still proud of myself for stepping out of my comfort zone and trying to be creative through things that I tend to avoid.

The final result.

To find my weekly reflections on this course and my learning, look Here

To find my other inquiry posts, look Here

Weekly Reflection 2: Cognitive Load and Multimedia

This week’s class focused on the concepts of learning design, looking at different technology integration models, such as the SAMR Model, the TPAK Framework, and Constructive Alignment. Each of these models outlines ways that we can integrate technology into our classrooms and provide us as future teachers with resources to help prevent cognitive overload in our students. I found the constructive alignment chart to be especially helpful as it helped me to see the bigger picture of a lesson or project outline.

Something else we talked about this week was the idea of cognitive overload and dual cognition in the context of multimedia. The concept of cognitive overload is where I would like to focus for the remainder of today’s post.

This video we watched in class is around 18 minutes long; however, it conveys the idea of cognitive load well if you want to watch a more in-depth video explaining these concepts.

Ray explains cognitive overload using an analogy of a glass of water; the water is the information that we are “pouring in” to the student, and the glass is the student’s working memory. “The more the glass fills up, the more strain on our cognitive resources,” says Ray. When the glass fills up all the way, the water simply pours out and the glass cannot hold the water any longer.

What I really liked about this video is how it highlighted how we, as teachers, can hopefully use multimedia without causing cognitive overload in our students. Although it seems like common sense, I had not thought about this concept, nor had I thought about the ways that multimedia could cause such an overload, especially since the bulk of our courses so far had highlighted the importance of multimedia in education. This video provided an excellent resource for me that I will continue to think about as I eventually start teaching students.

Free Inquiry 1: An Introduction to My Creative Adventure

I consider myself a creative person. Generally speaking, if something can be made, I’m going to try to make it myself. Want a bookshelf? Build it myself. Need a planner? I guess I’ll make a Bullet Journal as well. Bookbinding? Yeah sure! I’ll even dabble in painting a bit if it’s to enhance an object I already own. That being said, I’m not the most skilled artist. I create often out of practicality, rather than a desire to produce art, So it’s rare that I ever pull out a canvas and go at it with a brush, or draw something simply for the sake of it. Still, creativity through art is something that brings me both joy and peace even if its not amazing quality.

Going into the education program at UVic, I was warned that this would be a busy semester and that I would likely not have much time for the things I enjoy. However, if I’m going to survive, I will still need a creative outlet; this assignment allows for that.

For my inquiry project, I will explore different avenues of artistic expression each week by recreating the same image in different art styles. I have no formal art training, with the closest thing to it being a Grade 8 Art class 13 years ago. So this project will allow me to learn a bit about different art styles ranging from painting and drawing styles like a simple sketch and expressionism, to AI-generated images, and maybe even 3D modelling using play-dough?

Join me over the next ten weeks as I find my way through an artistic avenue I tend to avoid. I will be exploring artistic styles and techniques from a beginner’s eye. It will be messy and may not be “professional” quality or even just “okay,” but I think it will still be a fun way for me to learn the basics of a few art styles.

To find my weekly reflections on this course and my learning, look Here

To find my other inquiry posts, look Here

« Older posts Newer posts »

© 2025 Learning with Jess

Theme by Anders NorenUp ↑